Bottom Navigation Bar In Flutter is used to load the screens at one place. The Title and icons are placed at bottom of the screen. Particular screen loads by clicking on the name or the icon.

We creates the routes at the bottom of the screen. When any bottom item clicked the screen loads. The screens are loaded by creating the routes in the home screens. Every time when the another page loads the bottom navigation bar remains same only the above page changes.
How To Create Bottom Navigation Bar In Flutter
Material design library provide the way to create bottom navigation bar in flutter. Import the material.dart package in the required class.
import 'package:flutter/material.dart';
Create Widgets
First of all you have to create all the widgets according to number of bottom navigation items. I created 3 widgets which are below. Simply i created only text inside these widgets.
- ChatFragment()
- StatusFragment()
- CallFragment()
ChatFragment() Statefull widget
I shown only one widget because these are same in my case.
import 'package:flutter/material.dart';

class ChatFragment extends StatefulWidget {
  const ChatFragment({Key? key}) : super(key: key);

  @override
  _ChatFragmentState createState() => _ChatFragmentState();
}

class _ChatFragmentState extends State<ChatFragment> {
  @override
  Widget build(BuildContext context) {
    return Column(
      mainAxisAlignment: MainAxisAlignment.center,
      children: [
        Center(
          child: Text("This is Chat Screen", style: TextStyle(fontSize: 24),),
        )
      ],
    );
  }
}
All the above widgets loaded in this main class’s body. So we needed a main class widget.
Explanation
The inbuilt function of material design , bottomNavigationBar : BottomNavigationBar(), is used to create the bottom navigation. Inside it create your number of bottom items by using BottomNavigationBarItem(). Create label and icons inside it as below.
The below code should be written outside the body but inside the Scaffold().
bottomNavigationBar: BottomNavigationBar(
  items: <BottomNavigationBarItem>[
    BottomNavigationBarItem(
        icon: Icon(Icons.messenger, color: Colors.blue,), label: "Chat"),
    BottomNavigationBarItem(
        icon: Icon(Icons.stacked_line_chart_outlined, color: Colors.blue,), label: "Status"),
    BottomNavigationBarItem(
        icon: Icon(Icons.call, color: Colors.blue,), label: "Call"),
  ],
  currentIndex: selectedIndex,
  fixedColor: Colors.deepPurple,
  onTap: onItemTapped,
  selectedLabelStyle: TextStyle(color: Colors.red, fontSize: 20),
),
Handling Click Event
onTap(), method is used to load the particular widget. This is inbuilt function in flutter bottom navigation bar. Create a list of all widgets which are to be loaded as below;
int selectedIndex = 0;

//list of widgets to call ontap
final widgetOptions = [
  new ChatFragment(),
  new StatusFragment(),
  new CallFragment(),
];

void onItemTapped(int index) {
  setState(() {
    selectedIndex = index;
  });
}
How To Style Bottom Navigation Bar In Flutter
To style the items and other properties in flutter bottom navigation, some features can be used which are as :
fixedColor: Colors.red,
selectedLabelStyle: TextStyle(color: Colors.red, fontSize: 20),
unselectedFontSize: 16,
selectedIconTheme:
    IconThemeData(color: Colors.blue, opacity: 1.0, size: 30.0),
unselectedItemColor: Colors.black,
unselectedLabelStyle: TextStyle(fontSize: 18, color: Colors.pink),
How To Change The Title While Using Bottom Navigation Bar in Flutter
To change the title just create string list and provide the name of title as you want. To create the title dynamic use below code.
final widgetTitle = ["Chat", "Status", "Call"];
Change the title of Scaffold appBar as below.
appBar: AppBar(
  title: Text(widgetTitle.elementAt(selectedIndex)),
),
MainBottomClass.dart Full Code
All the above function, styles and other part are arranged into the main class. Copy and paste the following code in your project.
import 'package:ecommerce_app/BottomFragments/CallFragment.dart';
import 'package:ecommerce_app/BottomFragments/ChatFragment.dart';
import 'package:ecommerce_app/BottomFragments/StatusFragment.dart';
import 'package:ecommerce_app/Fragment/HomeFragment.dart';
import 'package:flutter/material.dart';

class MainBottomClass extends StatefulWidget {
  const MainBottomClass({Key? key}) : super(key: key);

  @override
  _MainBottomClassState createState() => _MainBottomClassState();
}

class _MainBottomClassState extends State<MainBottomClass> {
  int selectedIndex = 0;

  //list of widgets to call ontap
  final widgetOptions = [
    new ChatFragment(),
    new StatusFragment(),
    new CallFragment(),
  ];

  void onItemTapped(int index) {
    setState(() {
      selectedIndex = index;
    });
  }

  final widgetTitle = ["Chat", "Status", "Call"];

  @override
  Widget build(BuildContext context) {
    return Scaffold(
      appBar: AppBar(
        title: Text(widgetTitle.elementAt(selectedIndex)),
      ),
      body: Center(
        child: widgetOptions.elementAt(selectedIndex),
      ),
      bottomNavigationBar: BottomNavigationBar(
        items: <BottomNavigationBarItem>[
          BottomNavigationBarItem(
              icon: Icon(
                Icons.messenger,
                color: Colors.blue,
              ),
              label: "Chat"),
          BottomNavigationBarItem(
              icon: Icon(
                Icons.stacked_line_chart_outlined,
                color: Colors.blue,
              ),
              label: "Status"),
          BottomNavigationBarItem(
              icon: Icon(
                Icons.call,
                color: Colors.blue,
              ),
              label: "Call"),
        ],
        currentIndex: selectedIndex,
        fixedColor: Colors.red,
        onTap: onItemTapped,
        selectedLabelStyle: TextStyle(color: Colors.red, fontSize: 20),
        unselectedFontSize: 16,
        selectedIconTheme:
            IconThemeData(color: Colors.blue, opacity: 1.0, size: 30.0),
        unselectedItemColor: Colors.black,
        unselectedLabelStyle: TextStyle(fontSize: 18, color: Colors.pink),
      ),
    );
  }
}
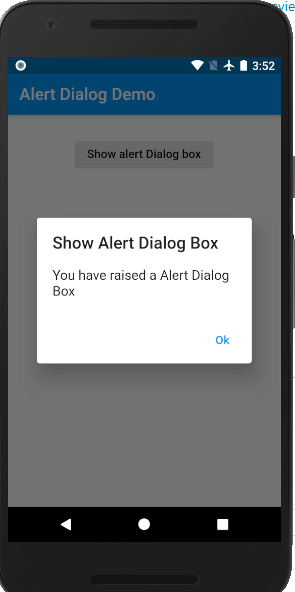
Conclusion
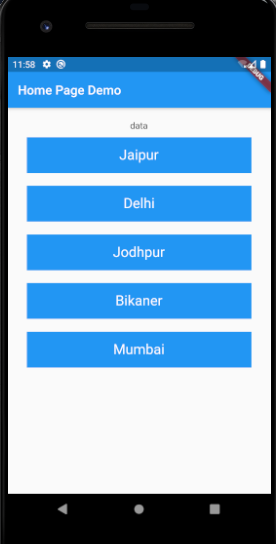
Below screenshot is the result of this tutorial. You can create according to you by changing the Label text and the icons.

Please comment if there is any issue or doubt. Thank you for reading this tutorial on fluttertpoint.