TextFormField widget is used to take input from the user in flutter. This is a simple and easy user input widget in flutter.
We can perform any operation on that user input data using TextFormField. You can use that user input, can send and show that input. You can store it into a TextEditingController type object.

How To Create TextFormField In Flutter
To create a TextFormField in Flutter, Flutter provides a TextFormField() widget. You can style it according to your needs. A simple and without any style underline TextFormField is below.
 TextFormField(
  controller: userInput,
 ),

How to Handle Input Data In TextFormField In Flutter Using Controller
To handle user input in TextFormField, create an object of TextEditingController class. Create a TextEditingController object like below and assign it to the controller property of TextFormField. Its object will hold the input data.
TextEditingController userInput = TextEditingController();
Style Input Text in TextFormField In Flutter
To give the style of user input text like fontSize, textColor, fontWeight and many other styles. Use the style component inside the TextFormField as below. There are many input text style properties that you can use to style. Some of them are below.
 style: TextStyle(
   fontSize: 24,
   color: Colors.blue,
   fontWeight: FontWeight.w600,
 ),
Decoration of TextFormField in Flutter
Use the decoration component inside the text form field as below. You can give hint text, label and border using the decoration property in flutter. You can also create error text, fill color. To use the icon left in the TextFormField use prefixIcon() property. To create an icon to the right side use the suffixIcon() property inside it. You can style following properties:
- Border
- Hint
- Lable
- Error text
- Prefix icon
- Suffix icon
- Focus border
- Fill color
- more..
Creating Border Of TextFormField In Flutter
To make the border of TextFormField, use the border property inside it as below.
 border: OutlineInputBorder(
  borderRadius: BorderRadius.circular(10.0),
 ),
Example of Decoration Properties
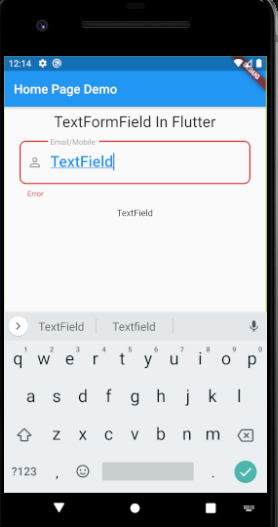
Example of all the above decoration properties.
 decoration: InputDecoration(
  focusColor: Colors.white,
  //add prefix icon
  prefixIcon: Icon(
    Icons.person_outline_rounded,
    color: Colors.grey,
  ),

  errorText: "Error",

  border: OutlineInputBorder(
    borderRadius: BorderRadius.circular(10.0),
  ),

  focusedBorder: OutlineInputBorder(
    borderSide:
    const BorderSide(color: Colors.blue, width: 1.0),
    borderRadius: BorderRadius.circular(10.0),
  ),
  fillColor: Colors.grey,

  hintText: "Email/Mobile",

  //make hint text
  hintStyle: TextStyle(
    color: Colors.grey,
    fontSize: 16,
    fontFamily: "verdana_regular",
    fontWeight: FontWeight.w400,
  ),

  //create lable
  labelText: 'Email/Mobile',
  //lable style
  labelStyle: TextStyle(
    color: Colors.grey,
    fontSize: 16,
    fontFamily: "verdana_regular",
    fontWeight: FontWeight.w400,
  ),
 ),
onChange() method In TextFormField
To get instant change user input data in the flutter text form field, onChange() method is used. You setState() inside it as below. The name variable give you the instant changes from TextFormField.
 onChanged: (value) {
  setState(() {
    String name = value;
  });
 },
How To Use Controller Value in TextFormField
Simply use the TextEditingController object and use .text() to get the input value like below.
userInput.text();
Now you can use the userInput object to get the user input data.
Complete Example Of TextFormField In Flutter
After describing each property I collected and combined together. Following is the full example of TextFormField. You can directly copy and paste it into your projects.
 import 'package:flutter/cupertino.dart';
 import 'package:flutter/material.dart';
 import 'package:flutter/services.dart';

 class DemoClass extends StatefulWidget {
  @override
  _DemoClassState createState() => _DemoClassState();
 }

 class _DemoClassState extends State<DemoClass> {
  TextEditingController userInput = TextEditingController();
  String text = "";

  @override
  Widget build(BuildContext context) {
    return Scaffold(
      appBar: AppBar(
        title: Text("Home Page Demo"),
      ),
      body: Container(
        padding: EdgeInsets.all(10),
        child: Column(
          children: [
            Center(
              child: Text(
                "TextFormField In Flutter",
                style: TextStyle(fontSize: 24),
              ),
            ),
            Container(
              margin: EdgeInsets.all(15),
              child: TextFormField(
                controller: userInput,
                style: TextStyle(
                  fontSize: 24,
                  color: Colors.blue,
                  fontWeight: FontWeight.w600,
                ),
                onChanged: (value) {
                  setState(() {
                    userInput.text = value.toString();
                  });
                },
                decoration: InputDecoration(
                  focusColor: Colors.white,
                  //add prefix icon
                  prefixIcon: Icon(
                    Icons.person_outline_rounded,
                    color: Colors.grey,
                  ),

                  errorText: "Error",

                  border: OutlineInputBorder(
                    borderRadius: BorderRadius.circular(10.0),
                  ),

                  focusedBorder: OutlineInputBorder(
                    borderSide:
                        const BorderSide(color: Colors.blue, width: 1.0),
                    borderRadius: BorderRadius.circular(10.0),
                  ),
                  fillColor: Colors.grey,

                  hintText: "Email/Mobile",

                  //make hint text
                  hintStyle: TextStyle(
                    color: Colors.grey,
                    fontSize: 16,
                    fontFamily: "verdana_regular",
                    fontWeight: FontWeight.w400,
                  ),

                  //create lable
                  labelText: 'Email/Mobile',
                  //lable style
                  labelStyle: TextStyle(
                    color: Colors.grey,
                    fontSize: 16,
                    fontFamily: "verdana_regular",
                    fontWeight: FontWeight.w400,
                  ),
                ),
              ),
            ),
            Text(userInput.toString()),
          ],
        ),
      ),
    );
  }
 }
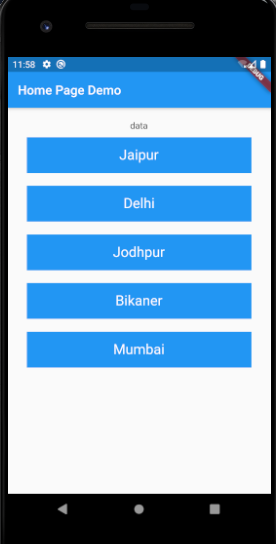
Final Result

Conclusion
In this example we created different types of TextFormField with its style properties. Please comment for any issue.
Thank you for visiting this tutorial on FlutterTPoint.
Please see more Flutter and Android tutorials for developing your skills.