In this tutorial we will learn how to open the camera in a flutter. And also how to take pictures using the camera. We will open the default camera of the mobile device. We use camera to take pictures and record videos.

Add Dependencies in pubspec.yml file
Add following dependencies into your pubspec.yml file. Remember while adding the dependencies, You have to write below the flutter tag in pubspec.yml file. The starting line must be matched otherwise it will throw the error.
 image_picker: ^0.6.7+9
 intl: ^0.15.7
 http: ^0.12.0+2
 local_auth: ^0.5.2+3
Camera Permission For ios
There is no need to add any camera permission for android.
If you are creating for ios also then add the following camera permission in your flutter info.plist file. Which is located inside the following directory – > ios – > Runner – > info.plist.
  <key>NSPhotoLibraryUsageDescription</key>
   <string>Allow access to photo library</string>

   <key>NSCameraUsageDescription</key>
   <string>Allow access to camera to capture photos</string>

   <key>NSMicrophoneUsageDescription</key>
   <string>Allow access to microphone</string>
Create Your Project
You can simply create a new flutter project in android studio. In this example I am not focusing on how to create a new flutter project. Creating a new flutter project is very simple. You have to click on -> Create a new Flutter project and then choose the directory where you want to save.
Camera In Flutter Full Example
After adding the dependencies and camera permission for ios in the flutter info.plist file. You can directly copy and paste the following code into your flutter project for use with the camera.
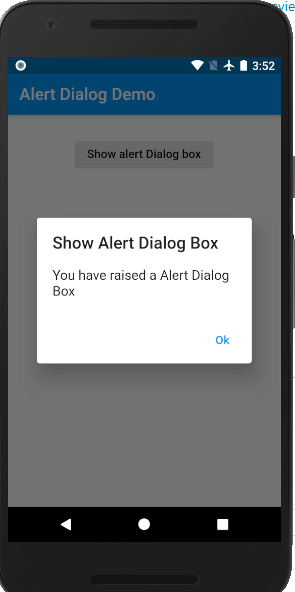
I divided the full camera code into 2-3 parts for better understanding. In this flutter camera example I created a Button on which click I am opening a dialog box, which will show you two options to select either open camera or pick from gallery. That is a method which is as below.
Import The Packages
Import following packages in your class where you are going to use this example. There can be errors while adding dependencies so you have to upgrade or downgrade these.
 import 'dart:async';
 import 'dart:html';
 import 'package:flutter/material.dart';
 import 'package:image_cropper/image_cropper.dart';
 import 'package:image_picker/image_picker.dart';
Create a File variable globally. Here I named it pickedImage you can use according to you.
File pickedImage;
Camera Method to Show Dialog in Flutter
Call the following method by clicking on which you want to open the camera or gallery options dialog in flutter. I am calling the following function on Button click then a dialog box will open which will show two options either select camera or pick from gallery.
 //show a dialog to open camera or from gallery
 void openDialog(BuildContext context){
  showDialog(
    context: context,
    builder: (context) => AlertDialog(
      content: Column(
        children: [
          ListTile(
            title: Text("Open Camera"),
            onTap: () {OpenPicker(ImageSource.camera);} ,
          ),
          ListTile(
            title: Text("Take From Gallery"),
            onTap: () {OpenPicker(ImageSource.gallery);} ,
          ),
        ],
      ),
    )
  );

 }
Open Camera Picker in flutter
After selecting one option either camera or pick from gallery call a function onTap() which is as below. Pass the ImageSource.camera or ImageSource.gallery corresponding to the option.
 //open picker after selected option
  OpenPicker(ImageSource source) async
  {
    pickedImage = (await ImagePicker.pickImage(source: source)) as File;
    Navigator.pop(context);
 }
How To Crop The Image Picked from Camera or Gallery in Flutter
To crop the camera picked image or the gallery picked image, use the following code. Call the below function and pass the image file into it. I will show different ratio options or the image cropper by zoom in or zoom out. I created a method named as _cropImage().
 _cropImage(File picked) async {
  File cropped = await ImageCropper.cropImage(
    androidUiSettings: AndroidUiSettings(
      toolbarTitle: "Crop Image",
      statusBarColor: Colors.red,
      toolbarColor: Colors.red,

      toolbarWidgetColor: Colors.white,
    ),
    sourcePath: picked.path,
    aspectRatioPresets: [
      CropAspectRatioPreset.original,
      CropAspectRatioPreset.ratio4x3,
      CropAspectRatioPreset.ratio3x2,
      CropAspectRatioPreset.ratio16x9,

    ],
    maxHeight: 100,
    maxWidth: 100,

  );
  if (cropped != null) {
    setState(() {
      _pickedImage = cropped;
      print("profilePath" + _pickedImage.toString());
      uploadFile(_pickedImage.path);
      // uploadImage(_pickedImage.path);
    });
  }
 }
Full Camera Code
I managed all the functions and other things of opening a camera or gallery in this flutter example in one class. You can directly copy and paste into your project. If there is any extra content you can delete it.
 import 'dart:async';
 import 'dart:html';
 import 'dart:io';
 import 'package:flutter/material.dart';
 import 'package:image_cropper/image_cropper.dart';
 import 'package:image_picker/image_picker.dart';


 class DemoClass extends StatefulWidget {

  @override
  _DemoClassState createState() => _DemoClassState();
 }

 class _DemoClassState extends State<DemoClass> {
  late File pickedImage;

  @override
  Widget build(BuildContext context) {
    return Scaffold(
      appBar: AppBar(title: Text("Demo"),),
      body: Column(
        children: [
          Container(
            margin: EdgeInsets.all(29),
            child: Center(
              //button to open camera or gallery
              child: ElevatedButton(
                onPressed: ()=> { openDialog },
                child: Text("Picture"),
              ),
            ),
          ),

          //to show the selected image
          Container(
            child:   pickedImage != null
                ? ClipRRect(
              borderRadius: BorderRadius.circular(50),
              child: Image.file(
                pickedImage,
                width: 100,
                height: 100,
                fit: BoxFit.fitHeight,
              ),
            ) : null
          ),

        ],
      ),
    );
  }

  //show a dialog to open camera or from gallary
  void openDialog(BuildContext context){
    showDialog(
      context: context,
      builder: (context) => AlertDialog(
        content: Column(
          children: [
            ListTile(
              title: Text("Open Camera"),
              onTap: () {OpenPicker(ImageSource.camera);} ,
            ),
            ListTile(
              title: Text("Take From Gallery"),
              onTap: () {OpenPicker(ImageSource.gallery);} ,
            ),
          ],
        ),
      )
    );

  }

  //open picker after selectiong option
  OpenPicker(ImageSource source) async {
    pickedImage = (await ImagePicker.pickImage(source: source)) as File;
    Navigator.pop(context);
  }

  //image cropper method

  _cropImage(File picked) async {
    File cropped = await ImageCropper.cropImage(
      androidUiSettings: AndroidUiSettings(
        toolbarTitle: "Crop Image",
        statusBarColor: Colors.red,
        toolbarColor: Colors.red,

        toolbarWidgetColor: Colors.white,
      ),
      sourcePath: picked.path,
      aspectRatioPresets: [
        CropAspectRatioPreset.original,
        CropAspectRatioPreset.ratio4x3,
        CropAspectRatioPreset.ratio3x2,
        CropAspectRatioPreset.ratio16x9,

      ],
      maxHeight: 100,
      maxWidth: 100,

    );
    if (cropped != null) {
      setState(() {
        _pickedImage = cropped;
        print("profilePath" + _pickedImage.toString());

      });
    }
  }
 }
Hope this tutorial will help you to use the camera or gallery photos. You can comment for any issue in the comment section. We will try to solve your problems. You can see also.
Thank you for reading this tutorial. Hope this helps you. Please visit more Flutter And Android Tutorial which can help you to grow your skill.

