TextField in flutter is used to take the input from the user. There are several ways to take the input from the user in flutter. But we are going to discuss the mainly used textfield in flutter.

TextField in Flutter
We can take input from the user and can use that input to perform any task. To take the input from the user TextField is used in flutter. There is also another way to take input by TextFormField in flutter.
Input Controller For TextField In Flutter Class
To store the input from the user, create an object of TextEditingController type as below in your class. It will store the user’s input.
TextEditingController inputController = TextEditingController();
Creating Input TextField In Flutter Class
To create a TextField just use TextField() Widget in your flutter class. It will show you an underline input area. To make the border you have to use some inputDecoration properties. Use the TextEditingController object here.
 TextField(
  controller: inputController,
 ),

How to Create Rounded Border of TextField
To create a rounded or rectangular type border of a textfield, use inputDecoration to design the TextField. There are many properties for designing the textfield. You can use the following features in decoration property. These are:
border: OutlineInputBorder( borderRadius: BorderRadius.circular(10.0), ),
Use above property inside decoration component as below.
- Add prefix icon
- Suffix icon
- Create lable text and style it.
- Give hint text and also style it.
- Error text and style
- Make border and style it.
 //decoration property
 decoration: InputDecoration(
  //add prefix icon
  prefixIcon: Icon(
    Icons.person_outline_rounded,
    color: Colors.grey,
  ),
  focusColor: Colors.white,
  // hintText: "Email/Mobile",
  fillColor: Colors.grey,
  errorText: "Error",
  //make hint text
  hintStyle: TextStyle(
    color: Colors.grey,
    fontSize: 16,
    fontFamily: "verdana_regular",
    fontWeight: FontWeight.w400,
  ),
  border: OutlineInputBorder(
    borderRadius: BorderRadius.circular(10.0),
  ),
  focusedBorder: OutlineInputBorder(
    borderSide:
        const BorderSide(color: Colors.blue, width: 1.0),
    borderRadius: BorderRadius.circular(10.0),
  ),
  //create lable
  labelText: 'Email/Mobile',
  //lable style
  labelStyle: TextStyle(
    color: Colors.grey,
    fontSize: 16,
    fontFamily: "verdana_regular",
    fontWeight: FontWeight.w400,
  ),
 ),
Styling Input Text of TextField
To give style the input text for TextField , use the style property as follows.
 style: TextStyle(
    fontSize: 24,
    color: Colors.red,
 ),
Complete code Together For TextField
I managed all these components and properties. You can simply copy and paste it into your project. The TextEditingController’s object is used to store the user input.
 Container(
  margin: EdgeInsets.all(10),
  child: TextField(
    controller: inputController,
    style: TextStyle(
      fontSize: 24,
      color: Colors.red,
    ),
    //decoration property
    decoration: InputDecoration(
      //add prefix icon
      prefixIcon: Icon(
        Icons.person_outline_rounded,
        color: Colors.grey,
      ),
      focusColor: Colors.white,
      // hintText: "Email/Mobile",
      fillColor: Colors.grey,
      errorText: "Error",
      //make hint text
      hintStyle: TextStyle(
        color: Colors.grey,
        fontSize: 16,
        fontFamily: "verdana_regular",
        fontWeight: FontWeight.w400,
      ),
      border: OutlineInputBorder(
        borderRadius: BorderRadius.circular(10.0),
      ),
      focusedBorder: OutlineInputBorder(
        borderSide:
            const BorderSide(color: Colors.blue, width: 1.0),
        borderRadius: BorderRadius.circular(10.0),
      ),
      //create lable
      labelText: 'Email/Mobile',
      //lable style
      labelStyle: TextStyle(
        color: Colors.grey,
        fontSize: 16,
        fontFamily: "verdana_regular",
        fontWeight: FontWeight.w400,
      ),
    ),
  ),
 ),
How To Use Input Data
When the user input something into the TextField. The input data goes into the TextEditingController’s object that is inputController which is created. You can name it according to you. If you console the value of this object use you will find the user input data. You can use it as follows.
    setState(() {
       var userName = inputController.text;
   });
Use the .text ( dott text ) extension after the object and here I am assigning it to another variable. This variable holds the real value of the user input.
Note : Use setState() for a better experience. It updates the data if any changes.
onChange() Method
You can use the onChange() method to get the instant changes of user input. Use setState() inside it.
 onChanged: (val) {
  setState(() {
    String userName= value;
  });
 },
Final Complete Example Class
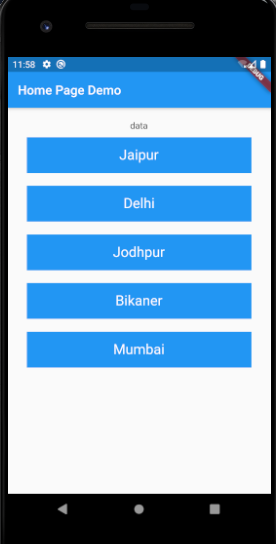
 import 'package:flutter/cupertino.dart';
 import 'package:flutter/material.dart';
 import 'package:flutter/services.dart';

 class HomePage extends StatefulWidget {
  @override
  _HomePageState createState() => _HomePageState();
 }

 class _HomePageState extends State<HomePage> {
  TextEditingController inputController = TextEditingController();

  @override
  Widget build(BuildContext context) {
    return Scaffold(
      appBar: AppBar(
        title: Text("Home Page Demo"),
      ),
      body: Container(
        padding: EdgeInsets.all(10),
        child: Column(
          children: [
            Center(
              child: Text(
                "Text input",
                style: TextStyle(fontSize: 24),
              ),
            ),
            Container(
              margin: EdgeInsets.all(10),
              child: TextField(
                controller: inputController,
                style: TextStyle(
                  fontSize: 24,
                  color: Colors.red,
                ),
                onChanged: (val) {
                  setState(() {
                    inputController.text = val.toString();
                  });
                },
                //decoration property
                decoration: InputDecoration(
                  //add prefix icon
                  prefixIcon: Icon(
                    Icons.person_outline_rounded,
                    color: Colors.grey,
                  ),
                  focusColor: Colors.white,
                  // hintText: "Email/Mobile",
                  fillColor: Colors.grey,
                  errorText: "Error",
                  //make hint text
                  hintStyle: TextStyle(
                    color: Colors.grey,
                    fontSize: 16,
                    fontFamily: "verdana_regular",
                    fontWeight: FontWeight.w400,
                  ),
                  border: OutlineInputBorder(
                    borderRadius: BorderRadius.circular(10.0),
                  ),
                  focusedBorder: OutlineInputBorder(
                    borderSide:
                        const BorderSide(color: Colors.blue, width: 1.0),
                    borderRadius: BorderRadius.circular(10.0),
                  ),
                  //create lable
                  labelText: 'Email/Mobile',
                  //lable style
                  labelStyle: TextStyle(
                    color: Colors.grey,
                    fontSize: 16,
                    fontFamily: "verdana_regular",
                    fontWeight: FontWeight.w400,
                  ),
                ),
              ),
            ),
            Text(inputController.text.toString()),
          ],
        ),
      ),
    );
  }

 }
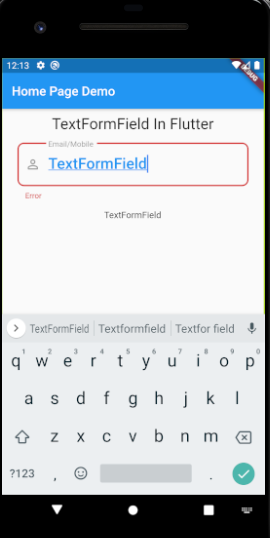
Result

Thank you for visiting this tutorial. I hope this helped. You can see also here flutter dev.
Please learn more Flutter and Android tutorials which will help you for better development.