Google Maps in Flutter” refers to using Google Maps within a Flutter app. Flutter is a framework for building native apps for iOS and Android from a single codebase. Integrating Google Maps into a Flutter app allows developers to add features like displaying maps, showing user location, adding markers, and much more.
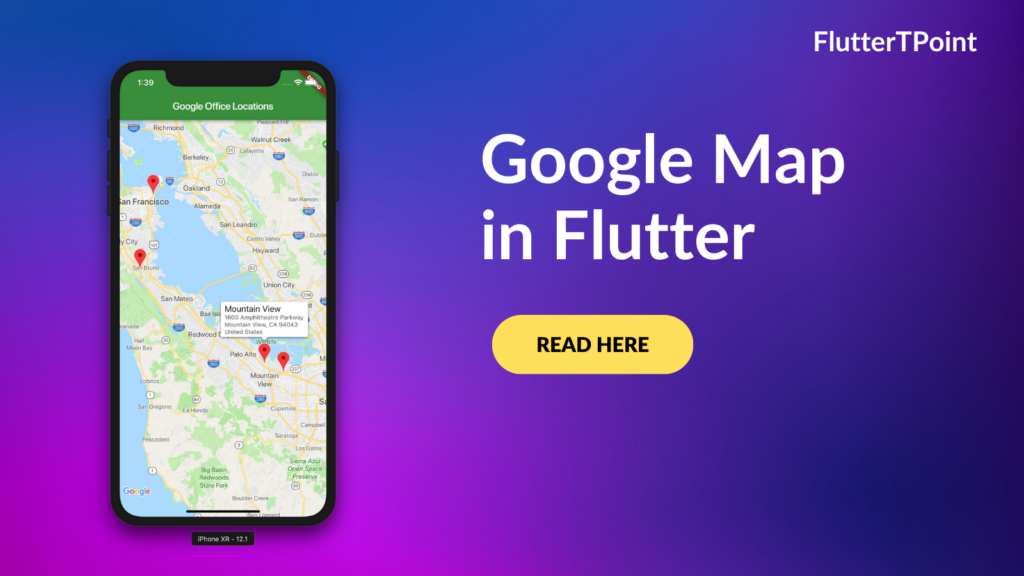
Here’s a simple breakdown of how to use Google Maps in Flutter with examples:
- Setting up Flutter project: First, you need to create a new Flutter project or open an existing one.
- Adding Google Maps dependency: You’ll need to add the
google_maps_flutterdependency to yourpubspec.yamlfile. This dependency allows your Flutter app to interact with Google Maps.
dependencies:
  flutter:
    sdk: flutter
  google_maps_flutter: ^2.0.10
Other configurations
- Configuring API keys: To use Google Maps, you need to obtain an API key from the Google Cloud Platform Console and add it to your app. This key is necessary for accessing Google Maps services.
- Displaying a map: You can display a map by using the
GoogleMapwidget. Here’s a basic example. In this example we have added some dummy lattitude and longitude for displaying the location.
import 'package:flutter/material.dart';
import 'package:google_maps_flutter/google_maps_flutter.dart';

void main() {
  runApp(MyApp());
}

class MyApp extends StatelessWidget {
  @override
  Widget build(BuildContext context) {
    return MaterialApp(
      home: Scaffold(
        appBar: AppBar(
          title: Text('Google Maps Example'),
        ),
        body: GoogleMap(
          initialCameraPosition: CameraPosition(
            target: LatLng(37.7749, -122.4194), // San Francisco coordinates
            zoom: 12,
          ),
        ),
      ),
    );
  }
}
Adding markers: Markers are used to indicate specific locations on the map. You can add markers to the map like this below example.
Marker marker = Marker(
  markerId: MarkerId('marker_1'),
  position: LatLng(37.7749, -122.4194),
  infoWindow: InfoWindow(
    title: 'San Francisco',
    snippet: 'A beautiful city',
  ),
);
Handling user interactions: You can handle user interactions such as taps on markers or map movements using callbacks provided by the GoogleMap widget.
GoogleMap(
  onMapCreated: (GoogleMapController controller) {
    // You can interact with the map controller here
  },
  markers: Set<Marker>.of(markers),
)
These are the basic steps for integrating Google Map into a Flutter app. With these functionalities, you can create various location-based applications like navigation apps, store locators, or geotagging apps.
Getting user Location
To get the user’s location and draw polylines on Google Maps within a Flutter app, you can use additional plugins along with google_maps_flutter. Here’s how you can achieve that:
- Getting User Location: To get the user’s location, you can use the
locationplugin. This plugin provides easy access to the device’s location services. First, add thelocationplugin dependency to yourpubspec.yamlfile:
dependencies:
  flutter:
    sdk: flutter
  google_maps_flutter: ^2.0.10
  location: ^4.3.0
Then, you can use the location plugin to get the user’s location. Here’s a basic example:
import 'package:flutter/material.dart';
import 'package:google_maps_flutter/google_maps_flutter.dart';
import 'package:location/location.dart';

void main() {
  runApp(MyApp());
}

class MyApp extends StatelessWidget {
  @override
  Widget build(BuildContext context) {
    return MaterialApp(
      home: MapScreen(),
    );
  }
}

class MapScreen extends StatefulWidget {
  @override
  _MapScreenState createState() => _MapScreenState();
}

class _MapScreenState extends State<MapScreen> {
  GoogleMapController mapController;
  Location location = Location();
  LatLng userLocation;

  @override
  void initState() {
    super.initState();
    getLocation();
  }

  void getLocation() async {
    try {
      var currentLocation = await location.getLocation();
      setState(() {
        userLocation = LatLng(currentLocation.latitude, currentLocation.longitude);
      });
    } catch (e) {
      print('Failed to get location: $e');
    }
  }

  @override
  Widget build(BuildContext context) {
    return Scaffold(
      appBar: AppBar(
        title: Text('Map with User Location'),
      ),
      body: GoogleMap(
        initialCameraPosition: CameraPosition(
          target: userLocation ?? LatLng(0, 0), // Center the map at user's location
          zoom: 12,
        ),
        onMapCreated: (GoogleMapController controller) {
          mapController = controller;
        },
        markers: userLocation != null ? {Marker(markerId: MarkerId('userLocation'), position: userLocation)} : {},
      ),
    );
  }
}
- In this example,
getLocation()function is called to fetch the user’s location using thelocationplugin. The obtained location is then used to set the initial camera position of the Google Map. - Drawing Polylines: To draw polylines on the map, you can use the
google_maps_flutterplugin itself. Here’s how you can draw a polyline between two points:
Polyline polyline = Polyline(
  polylineId: PolylineId('polyline_1'),
  color: Colors.blue,
  points: [
    LatLng(37.7749, -122.4194), // Start point
    LatLng(37.7749, -122.0794), // End point
  ],
);

GoogleMap(
  polylines: {polyline},
  // Other properties...
)
- This code will draw a blue polyline on the map connecting the start and end points.
By combining the location plugin and polyline drawing, you can display the user’s location on the map and draw polylines to represent routes or paths. See more about it from here.
Thank you for reaching out this tutorial. You can learn more useful tutorials.